It’s easy to print with leaves onto fabric and the results are beautiful. You might be surprised at all the beautiful shapes and detail in leaves when you stop to look at them, and they can make lovely prints and patterns.
You don’t need to be crafty or creative or have any special skills to print with leaves. You can make a fabulous table runner or tablecloth to add a handmade touch when entertaining, or print onto tea towels or calico bags for gifts. The beauty lies in the shapes and textures of nature and in the perfectly imperfect prints.
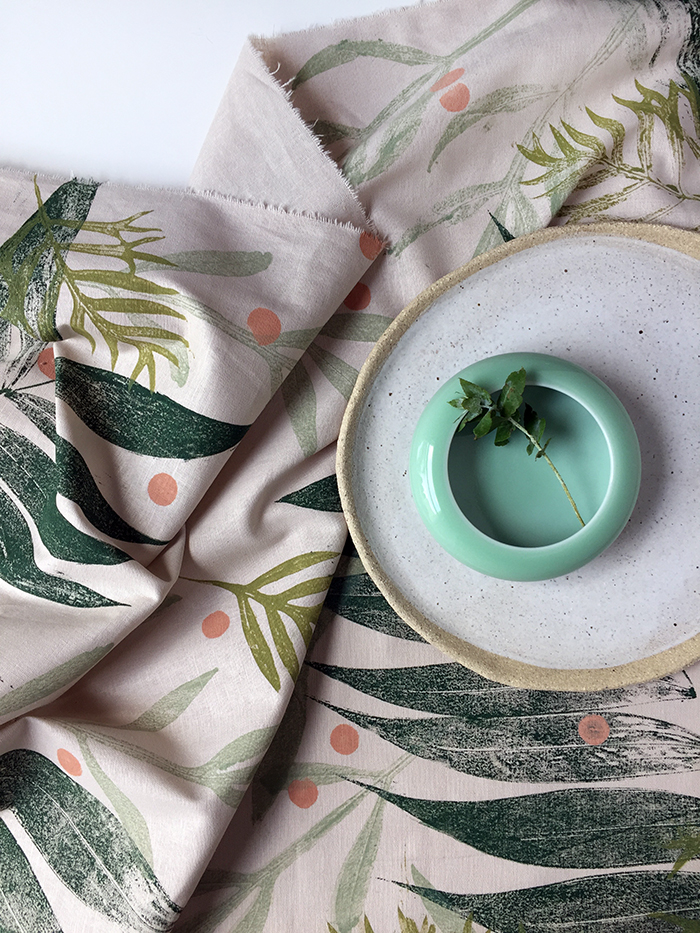
If you’ve started thinking about holiday table settings this tablecloth would add a gorgeous festive look to any gathering.

HOW TO PRINT WITH LEAVES ONTO FABRIC
You’ll need:
– Fabric paint or acrylic paint and fabric medium
– Plastic takeaway containers to mix paint in
– Cotton or cotton/linen blend fabric (prewash to remove sizing or coating if necessary)
– Small paint tray
– Small sponge roller
– Paper towel
– Brayer or a rolling pin
– Leaves
– Round stamp – optional
– Plastic drop cloth
– Newspaper
– Iron
GATHER LEAVES
Head out into the garden and look for nicely shaped leaves. I used 3 different sized and shaped leaves to give my design some contrast.
Make sure the leaves are clean and free of spider webs… and spiders! Lay the leaves out on your work surface so you can see how the shapes and sizes will work together.
MIX PAINT COLOURS
Mix up the colours if you need to. I added white to the sage green I bought to make it lighter. If you’re using acrylic paint mix in the fabric medium according to the instructions on the bottle.
START PRINTING
You might like to practice how to print with leaves before using your final piece of fabric. That way you can get a sense of what pressure you need to apply to get a good print from each type of leaf.
Set up your work surfaces. I used a long table for printing the fabric on, and covered it with a plastic drop sheet. A separate area to paint the leaves was covered in newspaper.
Lay the fabric out along the table.
Start with the largest leaf and place it face down on the newspaper. The veins are more prominent on the underside of leaves, so you get more detail if you print that side.
Pour some paint into the tray, and using the sponge roller evenly coat the underside of the leaf. Place the leaf paint side down onto the fabric being careful not to move it. Now take a piece of paper towel and place it on top of the leaf. Roll over it with the brayer once with even pressure. The amount of pressure you need to apply will depend on the thickness of the leaf, the amount of paint used, and the texture of the fabric. But remember that hand printing isn’t meant to look perfect. Beauty is in the imperfections.
Remove the paper towel and carefully peel up the leaf to reveal the leaf print. The same leaf can be used many times, unless it is particularly small or fragile.

Print all of the large leaves first, leaving space between them for the other leaves. To create a random pattern rotate the leaf each time you print it.
Allow the first colour to dry completely before starting the next.
Print the mid sized leaves in a random pattern, with some overlapping each other and the large leaves.
When dry, repeat for the final, small leaves.
I used a kid’s round sponge stamp to add a contrasting colour confetti dots to my design.
Allow the paint to dry completely before ironing the fabric to heat set the paint, according to the manufacturer’s instructions.

I left the edges of my table runner frayed and un-hemmed because I wanted a casual modern-rustic look. You can print onto a length of fabric like I did or onto a tablecloth that’s already hemmed.


